Are you wondering How to remove something stuck in a washing machine drum?
Washing machines are a staple in most households, and they certainly make our laundry chores a lot easier.
However, it’s not uncommon to find objects getting trapped in the washing machine drum, which can cause operational problems and reduce the machine’s efficiency.
At some point in your life, as a washing machine owner, you may have faced the situation where a small item, such as a sock or a bra wire, got stuck in the drum.
This can be frustrating and can lead to potential damage to your appliance if left unaddressed.
Here, we will walk you through the process of safely and effectively removing the trapped object to get your washing machine running smoothly once again.
Key Takeaways
- Identify and locate the stuck object in your washing machine drum
- Follow steps to safely remove items from the drum and check related components
- Take preventive measures to avoid future issues with trapped objects in your appliance
Identifying The Problem
When you start noticing unusual noises coming from your washing machine, it might be a sign that something is trapped in the drum.
In this situation, it’s crucial to identify the issue so you can effectively remedy it without causing harm to your appliance or laundry.
The first step you should take is to examine your washing machine drum thoroughly.
As soon as you hear a strange noise while the drum is spinning, grab a torch and carefully inspect the perforations inside the drum, looking for any objects that might be stuck.
Make sure the machine is switched off and unplugged from the mains before proceeding with your investigation.
If you hear a scuffling noise, it’s likely that an item of clothing is caught between the door and the drum.
In some cases, the object could be trapped between the inner and outer drum. Getting access to items stuck in these areas may require the removal of one or more panels from the washing machine.
In case the object seems to be stuck around or near the drum ring, you’ll need to be cautious when removing it to avoid causing any damage to the machine or your laundry.
Sometimes, removing the stuck item might be a challenging task, but taking time and being patient will help you avoid causing damage to your appliance.
Remember that every washing machine is different, and what works for one model might not suit another.
Always consult your appliance’s user manual for specific instructions and precautions before attempting to address issues related to the drum or a stuck item.
Moreover, if your washing machine drum won’t turn at all, it’s advisable to contact a professional technician or the manufacturer’s support team for further assistance.
Locating The Stuck Object In Washing Machine Drum
Firstly, make sure you unplug your washing machine from the mains to ensure your safety. With a torch in hand, closely examine the perforations inside the washing machine drum.
As you shine the light inside, take note of any strange noises or movements as you spin the drum. This will help you determine the location of the stuck item.
Items that commonly get stuck in washing machines include:
- Clothing
- Bra wires (underwires)
- Coins
- Keys
It’s important to routinely check your pockets before loading your clothing into the washer. This can prevent most situations where objects get stuck in the drum.
When checking for a bra wire or underwire, try feeling around the edges of the drum and the drum paddles.
These objects are notorious for getting lodged in tiny crevices and can be especially difficult to locate.
If you spot any items, such as coins or keys, trapped in the perforations, use a pair of needle-nose pliers or tweezers to carefully remove them.
Be gentle when pulling out the stuck item, as you don’t want to cause any damage to the drum.
If you’re still unable to locate the stuck object, you may need to take a more in-depth approach.
This could involve removing the heater or accessing the space between the inner and outer drums.
However, this should only be done if you feel confident in your ability to troubleshoot and repair appliances. Alternatively, it’s always a good idea to consult with a professional appliance technician for assistance.
Removing Items From The Washing Machine Drum
First and foremost, ensure your washing machine is switched off and unplugged before beginning the process. To remove an item stuck in the washing machine drum, follow these steps:
- Inspect the gap: Start by examining the gap between the inner drum and the outer drum. Use a torch to get a better view of the space and look for any signs of clothing, small objects, or debris trapped in the gap.
- Turn the drum: Gently rotate the washing machine drum manually to identify the location of the stuck item. As you slowly turn the drum, listen for any shifting or rumbling sounds that can indicate the presence of a trapped object.
- Utilise tools: To reach the stuck item, you may need a pair of needle-nose pliers, a coat hanger, or even a hook. Carefully manoeuvre the chosen tool into the gap and attempt to grasp or loop the obstructing item.
- Remove the item: Once the stuck item has been identified and grasped, gently pull it out of the gap, taking care not to damage the washing machine’s drums, springs, or any other delicate components.
- Double-check: After successfully extracting the unwanted object, inspect the washing machine drum once more, ensuring that no other objects remain lodged within the gap. Turn the drum again to ensure it moves freely without any unusual sounds or resistance.
By following these steps, you can confidently and safely remove any unwanted items trapped in your washing machine drum.
This will help prevent potential damage to your appliance and extend its lifespan, ensuring you get the most out of your investment.
Checking The Door Seal On Washing Machine
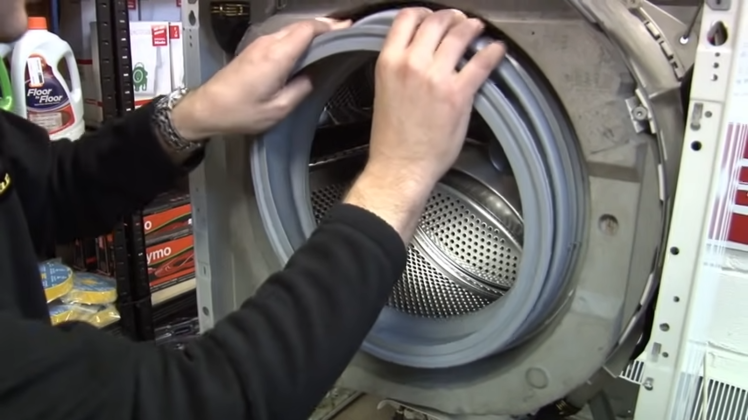
When examining your washing machine, it’s essential to inspect the door seal thoroughly.
This flexible rubber seal, also known as the door gasket or door boot seal, can sometimes conceal foreign objects or suffer damage over time.
To ensure the smooth functioning of your appliance and prevent further issues, follow these steps to check and deal with potential problems in the door seal.
First, make sure your washing machine is unplugged and empty before starting. Open the door to gain full access to the seal.
Carefully examine the entire door seal, running your fingers along the surface to feel for any trapped items, debris, or signs of damage.
Pay close attention to the folds and edges, as these are common hiding places for foreign objects and potential weak spots.
If you find any objects lodged within the seal, gently remove them—using a pair of needle-nose pliers can assist if the object is difficult to reach or tightly stuck. Be careful not to damage the seal during the process.
Should you discover signs of damage, such as tears, holes, or excessive wear, it’s crucial to address this issue promptly.
Damaged seals can permit water leakage and may reduce the washing machine’s efficiency.
In some cases, minor damage might be patched temporarily, before scheduling a replacement.
As you inspect your seal, also check for mold and mildew build-up. These can lead to unwanted odours and could harm the door seal’s integrity.
To tackle mold and mildew, a gentle cleaning solution (such as warm water mixed with vinegar) can be applied with a soft cloth. Be sure to rinse and dry the area thoroughly after cleaning to prevent additional build-up.
Retrieving Items From The Pump Filter
Sometimes, small items like coins, screws, nails, jewellery, hairpins, socks, bra wires, and more can get stuck in your washing machine, causing performance issues or leaks.
If you suspect that something is trapped inside, one of the first places you can check is the pump filter.
Before you begin, make sure to turn off your washing machine and unplug it from the power source. You don’t want any water or electricity flowing while you’re working on the machine.
Next, locate the pump filter, which is typically found at the bottom front of the machine, behind a small door or panel. Consult your machine’s manual if you’re having trouble finding it.
Once you’ve found the pump filter, place a shallow tray or absorbent towels under the filter door to catch any water that might spill when the filter is opened.
Slowly unscrew or remove the filter cap, letting the water drain out gradually. Be prepared for a bit of a mess, as some water will likely spill during this process.
With the filter cap removed, carefully reach into the pump filter housing and feel around for any foreign objects.
Use a torch if necessary to help you see better, and a pair of needle-nose pliers can help you grasp and extract any items that are stuck.
Be cautious not to damage the interior of the filter housing while reaching inside.
While you have the filter cap off, it’s also a good opportunity to give it a thorough cleaning to remove any lint, fabric, or debris that may have accumulated.
Simply use a soft brush or cloth, and some mild detergent to clean the filter screen and any other components in the area.
After you’ve retrieved the trapped objects and cleaned the pump filter, screw the filter cap back into place, ensuring that it is tightly secured to prevent any leaks during future wash cycles.
Finally, plug the washing machine back in, turn it on, and run a brief rinse cycle to make sure there are no leaks and the machine is operating as expected.
Examine The Heater And Bearings
To tackle any issues with your washing machine, you need to first examine the heater and bearings.
Before starting, make sure to turn off and unplug the washing machine to avoid any electrical accidents.
Begin by locating the outer drum of your washing machine. The heater can usually be found behind or beneath the outer drum.
To access the heater, you may need to remove the back panel of the machine or tilt the machine forward, depending on the model.
Carefully examine the heater for any visible signs of damage, rust or burns that might indicate it needs to be replaced.
Next, let’s take a look at the bearings, which help to keep the drum rotating smoothly. Over time, these bearings can wear out and become noisy, which may be the cause of the stuck item.
To examine them, you will need to remove the inner drum by accessing the back of the machine.
Once the inner drum is removed, inspect the bearings by turning them and checking for any roughness or stiffness in their movement.
If any issues are found with the heater or bearings, you may want to consider replacing them to ensure your washing machine functions properly and produces the best results.
Keep in mind that you should always consult your washing machine’s user manual or seek the help of a professional if you’re unsure about any part of the process.
Remember that regular maintenance of your washing machine, including checking the heater and bearings, can help prevent problems in the future.
By doing so, you’ll be able to keep your machine in optimal condition and effectively remove any trapped items.
Handling Drum Paddles And Obstructions
Often, small items or obstructions can get caught in the washing machine drum, leading to issues with the appliance’s performance.
Firstly, always ensure to unplug your washing machine before attempting to address any issues.
This safety precaution guarantees that you avoid any potential electrical hazards during the process.
To deal with obstructions, start by inspecting the drum paddles. Drum paddles, also known as lifters, can sometimes trap small items within them.
Gently push and agitate the paddles to see if any objects come loose. If necessary, remove the drum paddle by carefully prying it out and inspecting it for any trapped items.
Next, check for obstructions between the inner and outer drums. You can do this by spinning the drum by hand; if you feel considerable resistance or a scraping sound, there might be something stuck there.
To remove the obstruction, pull the washing machine’s seal with one hand to create a gap between the seal and the inner drum, and use a torch to inspect for foreign objects.
If you find any, carefully remove them with a pair of needle-nosed pliers.
If the problem persists, it might be time to check the sump hose and water pump. The sump hose connects the drum to the pump, and sometimes small items can get caught in it.
Disconnect the hose and examine it for possible obstructions. Clear out any debris and ensure there’s no damage or cracks in the hose before reconnecting it.
After examining the sump hose, check the water pump itself. Ensure it is free of any debris that could hinder its performance.
If your washing machine continues to agitate, shake or make unusual sounds, it might be worth seeking the help of a professional technician to diagnose the issue further.
Remember, by routinely checking your washing machine for obstructions and addressing them promptly, you can prevent potential damage and ensure your appliance performs optimally.
Fixing Leaks And Overloading

When it comes to fixing leaks in your washing machine, it’s essential to first identify the source of the problem. Leaks can typically occur in a few common areas, such as the hose, pump, or tub.
Once you’ve found the issue, you can proceed to fix it with the appropriate tools, such as a putty knife, slip joint pliers, or socket/ratchet set.
Remember, always turn off your washing machine and unplug it from the power source before attempting any repairs.
Draining issues can also lead to leaks. To address this, check that the hose is not kinked, clogged, or damaged, which could prevent water from properly draining.
If you find any issues, consider replacing the hose or fixing the kinks to ensure proper drainage and avoid leaks.
Additionally, the spin cycle plays a crucial role in preventing leaks and maintaining the overall functionality of your washing machine.
If you notice that your clothes are coming out wetter than usual, double-check the spin speed setting.
Be aware that selecting gentle or delicate spin speeds may leave more water behind in the load, as these settings prioritise preventing fabric damage.
Adjusting the spin speed to a higher setting may help resolve this issue.
Overloading your washing machine can also lead to problems, including leaks and poor performance.
To prevent overloading, ensure that you’re putting in the appropriate amount of clothes for each load, according to the machine’s capacity.
Overfilling can strain the motor, causing it to work harder and potentially leading to leaks from overloaded components.
Dismantling The Washing Machine
Before you start dismantling your washing machine to remove a stuck item, make sure to unplug it and disconnect any water supply lines.
Safety is essential, so never work on an appliance that’s still connected to electricity or water.
Begin by removing the back panel of your washing machine. This typically involves unscrewing several screws located around the perimeter of the panel.
Take note of the locations of these screws, as you’ll need to reattach the panel later. Once the screws are removed, gently lift off the back panel and set it aside.
Next, you’ll need to access the motor, which is usually connected to the drum via a drive belt. The motor might be mounted on a bracket, held in place with screws, bolts or clips.
Carefully undo these fastenings, ensuring you support the motor to prevent damage. Be mindful of any wiring that may be connected to the motor, and disconnect it if necessary.
With the motor detached, you can now examine the drive belt connecting it to the drum.
Depending on your washing machine’s make and model, the drive belt might be held in place by tension or a clip.
Carefully remove the belt by either unscrewing any fastenings or unhooking it from the bracket or clip.
Having completed these steps, you should have easier access to the washing machine drum, making it simpler to locate and remove the stuck item.
Keep track of any screws, bolts or clips you removed, as you’ll need them when reassembling your washing machine.
Remember, always refer to your appliance’s user manual for specific instructions relating to your make and model.
If you’re unsure about any steps or think you may require professional assistance, it’s essential to seek help from a qualified technician.
Tips For Preventing Future Issues
Taking a few precautionary measures can help you avoid future problems related to items getting stuck in your washing machine drum. Here are some tips for preventing such issues:
- Always check your pockets: Empty your pockets before tossing clothes into the washing machine. This can prevent small items, such as coins or keys, from entering the drum and causing noise or damage.
- Secure clothing: Fasten any zips, hooks, or buttons on your clothing to reduce the likelihood of snagging and items getting caught in the drum.
- Use laundry bags: Place delicate items, such as bras with underwires and clothing with strings, in protective laundry bags before washing. This can help prevent these items from getting caught in the drum and ensure they are cleaned safely.
- Separate and balance loads: When loading your washing machine, try to evenly distribute clothes of different sizes and weights. This can help reduce the noise generated during the washing cycle and minimise items becoming trapped between the drum and the door.
- Inspect your washing machine regularly: Make a routine check of the drum to spot any loose items or potential snag points. This will allow you to address any issues before they become more severe.
By following these easy tips, you can prevent future issues with items getting stuck in your washing machine drum, offering you a more efficient and worry-free laundry experience.

Founder of homeappliancegeek.com, avid cook, and lover of Asian food.
Signature dishes include Thai Red Curry, Chicken Saag, Bibimbap and Sushi.
Massive clean freak; a habit baked-in after spending 9 years in the catering industry.
The one appliance he couldn’t live without? Easily the dishwasher (total relationship saver!).